Making a Space Invaders Clone
Here is a link to the Space Invaders game that I created
https://walkerscrisps.itch.io/an-simple-space-invaders-clone
What is Space Invaders?
Space Invaders was an arcade game that came out in 1978 and the goal of the game was to defeat all of the aliens that were on the screen and the player could only move left and right so they had to keep shooting them from the bottom of the screen and they move left and right so it made it harder to kill all of them so the player has stop the aliens from getting to the bottom of the screen so the player would defend the bottom of the screen from the aliens.
The Process of Making a Space Invaders Clone in Unity
Setting Up the Camera
The first thing I did when setting up this project was to make sure the camera was set to orthographic and what this means is that any 3D objects will be shown in a 2D view and I want to use this camera type because for this type of game I need a flat 2D view also I am going to set the camera size of the game to 5.4.
Importing My Own Sprites/Images
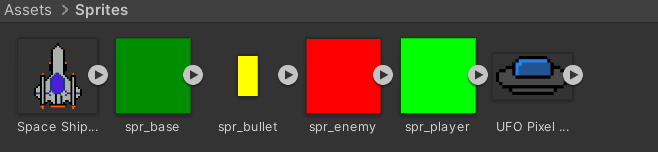
Before I start adding any objects to my game, I am going to need some sprites/images for the objects and in this case, I am going to need a sprite for the spaceship which the player will control when they play the game and I am going to need a sprite for the enemies so I created two sprites for the player and the enemy and I did this by making some pixel art for them in Photoshop and when I finished making them and I imported them into my unity project and I did this by dragging them into a folder that I made for the sprites in the assets window of the Unity editor.
Also, when adding any images that you made to a Unity project make sure you use PNG as the image format and the reason for this is because a png will have a transparent background which means the image won’t have a background when importing the image and the reason you wouldn’t want a background since you only need the image that you made and if it had a background it wouldn’t look good with anything else in the game due to the background so it’s best not to have one on the images you make.
Setting Up the Player Object and Writing the Player Behaviour Script
The first I need to do with the player object is to add a 2D rigid body component to it so it can react to gravity as if I didn’t do this it would fall right through the level also I need to freeze the rotation of the player object on the Z and Y-axis and the reason I did this because if I didn’t it the player object would be able to move up and down and for this type of game the player won’t need to be able to move up and down and the other reason I did this is because it will stop the player sprite from rotating.
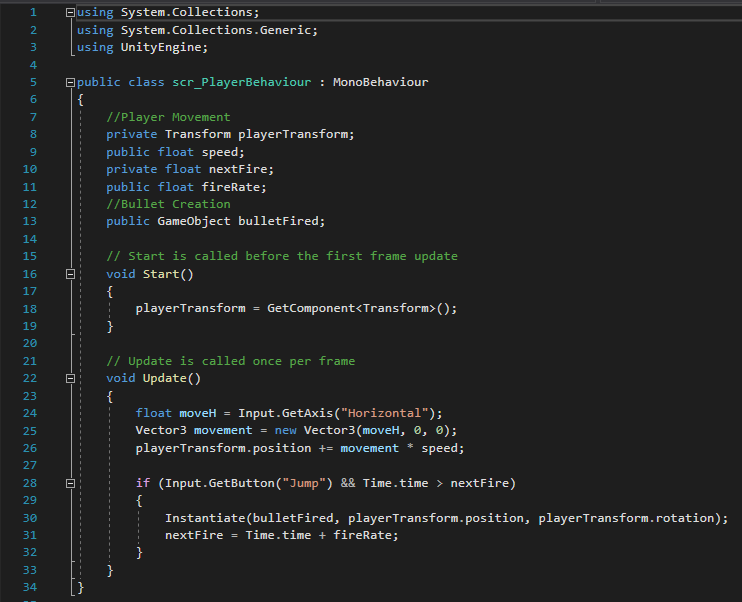
Now that the initial setup for the player object is out of the way I am going to make a script for the player object and this script will contain all the actions relating to the player object such as moving etc. So the first thing I will put into the player behaviour script is in the start function of this script is to get the transform component of the player object.
However, in my previous prototype, I would have done this in the unity editor by making a container where you would drag the correct component onto that object however since I don’t need this variable to be public and accessible in the editor I will be getting the component that I need in this script instead and in this case, I need the transform component of the player object and this can be done in this script by using the GetComponent function and this will allow you get any component that you might want to use in a Unity project.
Now in the update function of this script, I will be setting up the movement of the player object and you use the Input.GetAxis function to allow it to be able to detect input from the player’s keyboard and in this case it will be the horizontal input so this will be the left and right arrow keys and I will be using a float variable to do this because every frame in the game it will determine the value by which arrow keys the player presses on the keyboard and it come back to either -1 for the left arrow key and 1 for the right arrow key.
I need to add the value of whatever the player’s horizontal movement is to the X coordinate of the player object and the coordinate will change depending on if the player is moving left or right however this will be a problem due to that I am trying to add only the value of the player’s horizontal movement to the position of the player object and this is a vector3 which consists of a set of three values which are the X, Y, Z coordinates.
Since I only need the player to be able to move left and right which is along the X-axis only however since a vector 3 needs the Y and Z axis as well I will need these values as well and the way to get around this issue is to multiply the value of the vector 3 right or left by the Input.GetAxis variable I used earlier and the value of the vector 3 depends on which key the player is pressing so for example vector 3 right will have this 3 values 1,0,0 then I can add these values to the position of the player object so it will decrease if the left key is pressed or increase if the right key is pressed as I need it to do. The last thing I am going to do with the player object, for now, is to just adjust the speed of the player to make sure it’s not too fast or not too slow and I can do this by changing the value in the editor since I made the speed variable public.
Creating Bullets and writing the Bullet Behaviour Script
Now I am going to create a bullet object so the player will be able to shoot bullets so the first thing I am going to do is to drag the bullet sprite that I created onto the scene view of the game and add a RigidBody 2D component to it and I will need to adjust the material type of the rigid body due to I don’t want it any forces acting on it because if it happened the bullet would be able to be pushed back so I will set the type to kinematic so this won’t happen.
Now that I set up all of that I now make a script for bullet object and this script will handle everything to do with the bullet object and this script will be somewhat like the one I made for the player object as I will need to need to make a variable for the speed of the bullet object and need to get the transform component of the bullet object. Next, I will change the update function to a Fixed Update function and the reason I did this was that I need it to run multiple times per frame as the normal update function can only run it once per frame and in the fixed update function I will make the bullet move upwards so it will be able to shoot the enemies when I add them since they will be coming from the top of the screen.
Making a Prefab of the Bullet Object
Now I need to make a prefab of the bullet object and a prefab is that it allows you to store a game object will all the settings and the components you put on the object and the reason I did this because when the player shoots a bullet it will make copies of the prefab it shoots it instead of having to have multiple versions of the bullet on the screen and if I didn’t use a prefab I would manually keep on adding bullets to the scene view so it wouldn’t be efficient to do it this way. To make a prefab of any object in Unity you simple the object you have in the hierarchy to the assets window in the editor.
Setting Up input for when the player shoots the bullet

Now that I made the prefab for the bullet object I need to allow the player to be able to shoot bullets when the player presses a key on their keyboard and to do this I will go back to the player behaviour script and add more stuff to it such as a reference to the object that I want to create and in this case, it is the bullet that the player is going to shoot and then a reference to the location of where the bullet will be made and the key that I will set up which key the player will press to shoot the bullet and I have it to be on the spacebar and I did this by making an if statement and it will check if the player is pressing the spacebar or not and if the player is it will shoot the bullet.
Next, I need to add two objects into the bullet fired and the bullet spawns in the Unity Editor and this will be on the player object, so I dragged the bullet prefab into the bullet fired slot and dragged the player object into the player spawn slot.
At the moment the player will be able to shoot at a very fast rate so I am going to change this by creating two new variables called next fire and fire rate and in this script, I will make it check the time since the beginning/start of the game and it makes sure it’s greater than zero then it will set the value for the next fire to be the current time of the game and it will add on the value the fire rate on to it so what this means that the game will have to wait until fire rate is the same time as the current time of the game and then the player will be able to shoot again.
Setting Up the Enemies and Writing Enemy Behaviour Script
The first thing I need to do with the enemy is to drag the sprite that I created for the enemy onto the scene view and then give it a Rigidbody 2D and set it to Kinematic like how I did with the bullet also I need to give it a box collider 2D and set it to Is trigger and what this means is that when something collides with the enemy something will happen and I would need to set up that in a script to tell it what will happen something collides with like the bullet or player.
For the enemy behaviour script, it is pretty much the same as I did for the bullet script and that is to make a variable that will get the enemy’s transform component and the variable for the speed of the enemy object so how fast it will be able to move the only difference between this script and the bullet script instead of making the object move up Instead I will be making it move down since I want the enemy’s in the game to move down towards where the player is.
Adding a Tag to the Enemy Object
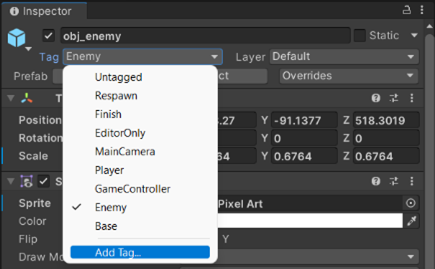
Now I am going to add a tag onto the enemy object and by default, it won’t have any tags attached to it and to make a tag all you need to do is to select the enemy object then look at the inspector view and click on the tag button and select add a new tag then it will take you to a window where you will be able to type the name of the tag that you want to make and in this case, I will be calling the tag enemy because this tag will be on all of the enemies that I will have in the game.
Making an OnTriggerEnter2D Event
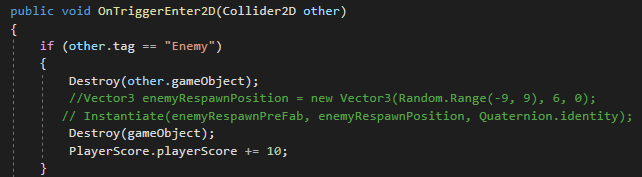
Now I am going to need to go back to the bullet script that I made to add one more thing for now and I am going to add an OnTriggerEnter2D event and basically what this will do is that if it collides with the object that I tell it to collide with and something will happen and in this case, it will be the bullet colliding with the enemy and when it does it will destroy the enemy if the player hits the enemy.
How I did this is by setting the tag of the object to the enemy tag that I created earlier and any object with that tag will be destroyed if the bullet object hits it. Also, in this event, I will setup the enemy being able to respawn as I don’t want the player to be able to destroy all of the enemies that are currently on-screen and then no more will appear on the screen so to set up the enemies to be able to respawn I will use a Vector 3 function as we did earlier to set up the position of where the enemy will be able to respawn.
Now I am going to create a prefab of the enemy object then I will go the inspector view of the bullet object and drag in the enemy prefab that I just created into the enemy respawn prefab box and now that I have done this the game will know which object that needs to respawn in the game since I told it which object it needs to use.
However, at the moment the enemy will just respawn at the same location at the top of the screen and to make it harder for the player to defeat the enemies I will use randomisation and what this will do is to make sure the enemy object doesn’t respawn in the same location every time and to do this I when back into the bullet script and added the random.range to the vector 3 variable that I created earlier now the enemy object will be able to respawn anywhere within the coordinates that I set in the vector 3 and the ones I gave it to wherefrom -9 to 6 so it can respawn anywhere between those values.
Additional Research I Did for the Space Invaders Clone
All the stuff I have covered so far to do with the Space Invaders clone that I created was all of the stuff that I was taught in lessons however I wanted to add more elements to this game because at the moment it didn’t feel finished due to that the player wasn’t able to lose or win the game due to that the enemy currently would just keep on respawning and the game would go on forever also I wanted a scoring system to the game so when the player would kill an enemy they would gain points.
So to add these features I took the knowledge that I learned from the Cookie Clicker game I previously created and what I mean by this is that I needed to add UI elements for the score when the player won or died and I learned how to do this when making my Cookie Clicker game also I did some research by looking up videos on YouTube relating to the things that I wanted to add to my project and I used one video, in particular, to help implement all the elements that I wanted and it was a video by Stephen Barr on YouTube also here’s a link to the video. https://www.youtube.com/watch?v=cnfwNzpoIlA&t And this video covered an in-depth look into how they would create a Space Invaders like game in Unity and this included all of the features I wanted for my project so I combined the work I have been taught in lessons with the stuff I learned from this video to make the final version of my Space Invaders game and now I will explain how I implemented these additional elements to my game.
Adding the Score System
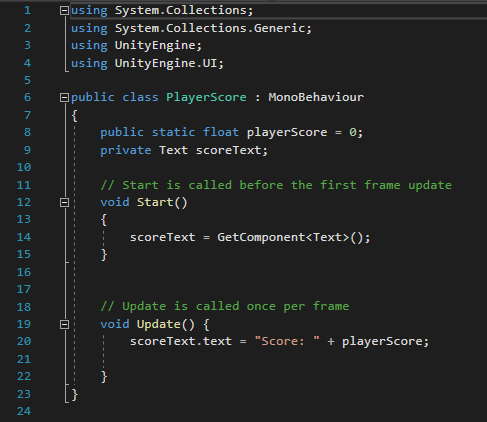
So the first thing I did before writing a script that would handle how the scoring system was going to work, I added text which contains what the player’s score was when they play the game then I wrote a script which contains handle the UI elements of the scoring system so the first thing I wrote I did in this script was to create two variables and the first one was for the player’s score and I set it to zero by default as the score would only increase when the player got a point also the second variable that I created was for the text and this text would contain display whatever the player’s current score was. Now in the start function of this script, I will tell it to get the text component that I created in the editor so it will be able to access the text that I made and be able to display the player’s score when they play the game and the last thing I need to do in this script is in the update function of this script I will make it update the text whenever the player’s score changes like if it increases when they kill an enemy and now I just need to attach the player score script to the score text in the Unity editor for it displays the player’s score.
However, I haven’t set how many points the player will get when the enemy is defeated so if I were the play the game right now it would display the score text, but it would always stay at zero because I haven’t the value for how many points the player will get when they kill an enemy and to set the value of this I went back to the player’s bullet behaviour script and when to section of the code where the bullet has been set to destroy the enemy object and in here I added one line of the code and this will reference the player score that I created and it will give the player 10 points each time an enemy is killed.

Setting Up The Game Over And Restarting The Level Events
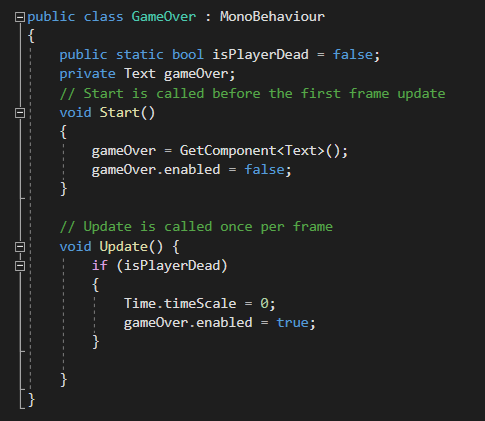
The first thing I did for both of created text for when the player got a game over and the text that would tell the player to restart the level so they try again so firstly I will be talking about the script I created for the game over the event and this script I created two new variables that would be for when the player is dead and by default I want this to be false because I don’t want the player to get a game over when they first play the game also the other variable that I put in this script will be for the text that will display when the player gets a game over.
In the start function of this script, I told it to get the text component so it will be able to display the game over text and to set the game over to not being enabled when the player starts the game. And in the update function of this script, it will check if the player is dead and if that’s true, game over event will be triggered and the last thing I need to do with this script is to attach it to the game over text that I made earlier, and this can be done in the unity editor.
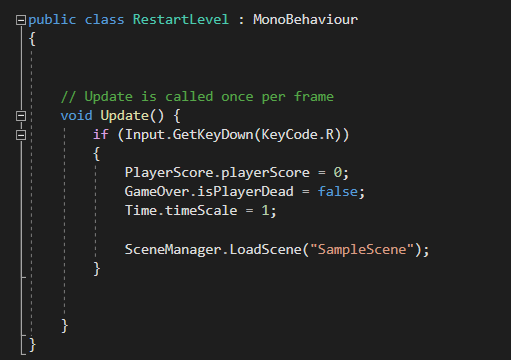
Now I will get on how I did the restart level event and for this, I made a script for this event and for this I won’t need the start function so I removed it from this script I will only need the update function and in this, I wrote an if statement where if the player presses the r key on their keyboard it will set the score back to zero as when the player restarts the game I don’t want them to keep their score from before they got a game over and had to restart and it will set game over to being set to false and then it reloads the level. The last thing I did is to create an empty object that I will attach this script to and the reason I am attaching it to an empty object is because the restart text will also appear when the player gets a game over so I will attach it to an empty object instead.