Introduction to 3D Asset Design (Brief Overview of Maya and its User Inference)
In this, I will be discussing how I learnt to use Maya to create various 3D models such as what tools I used to help me create models and what challenges I had to overcome when creating 3D models using Maya. Also, I will be discussing the research that I undertook to help me come up with the designs for my 3D models and how my main piece fits the environment my group are creating for the environment design module.
What is Maya? And what it can be used for
Maya is a piece of software that mainly focuses on letting you create 3D models however you can do a lot more with Maya than just creating 3D models such as it can be used for creating animations using the models you have created in the program because of this Maya is used in multiple industries that use 3D animation so Maya can be used for a large variety of purposes not just for making models to be used in games. Also, the wide variety of tools that Maya includes makes the process of making models more easily this is another reason why it is widely used.
How the Maya User Inference Works
Before I attempt to create anything using Maya I am going to try and familiarize myself with how the user interface works and what I mean by this is what part of the interface does a particular function. Also, what keys I will need to press to perform a specific function such as moving the camera, panning, zooming in and out etc.
So, I am going to do a basic walkthrough of how the user inference works in Maya so firstly I am going to discuss the controls for the camera and the viewport. In Maya by default, it will be set on the perspective view and this view allows you to freely move around your 3D model in any direction.
However, there are 3 more different perspectives in Maya which are front, side, and top perspectives and by pressing space on your keyboard it will show all these views on your screen as separate viewports as you can see in the image below.
The reason why you would want to see these different perspectives is that it will allow you to see how your 3D model looks from different angles and this would be useful because you are able to see what the models look like from the sides and the top it might not look the way you intended I to from that angle so this will allow you to see what it looks and makes changes to your model from any perspective.
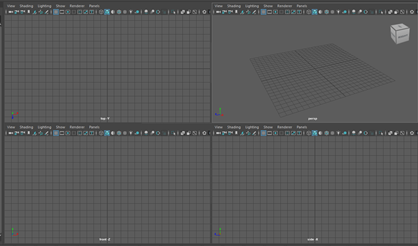
Now I am going to discuss how you control the camera in Maya to move the camera around you then press the alt key and the left mouse button allows you to move the camera in any direction that you want to. Also, to zoom the camera in and out you have the press alt and the right mouse button and lastly the pan the camera in any direction you press the alt and the middle mouse button these are all of the ways you can adjust the camera in Maya so overall you have a lot of options to adjust the camera to the way you that you want it to be.
What is the Primitives Menu?

The primitive’s menu is located at the top of the user inference in Maya, and this is where you will start every time you want to create anything in Maya because it contains all the basic shapes that you might want to use such as a cube, sphere etc.
By clicking on the shape that you want to create it will place that shape onto your scene once it is placed onto your scene you can make any changes to it such as scaling it or rotating it etc and to be more precise when making changes to any objects you place in Maya you can use the attributes editor and this will allow you to adjust some values of the object you have selected such as the height, width and the depth and many more attributes you can adjust.

Radial Menu
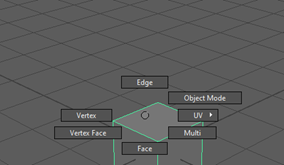
Now, I am going to discuss the Radial menu and for this menu to appear you have to hold down the right-click button your mouse then it will give you access to various shortcuts that you might want to use and this makes it easier to get things done more quickly due that you have press one button and you will able to access a lot of tools through this menu and by default in Maya it will show shortcuts for the selection menu which allows you select parts of the model you have created.
Outliner
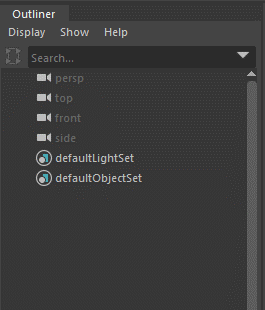
The Outliner is an important part of the Maya interface because it will display everything that is currently in your scene onto a list from this list you will be able to select, edit hide or delete anything that is currently placed into your scene also it allows you to rename anything from here so you can give any object a name so you know what object that is in your scene.